
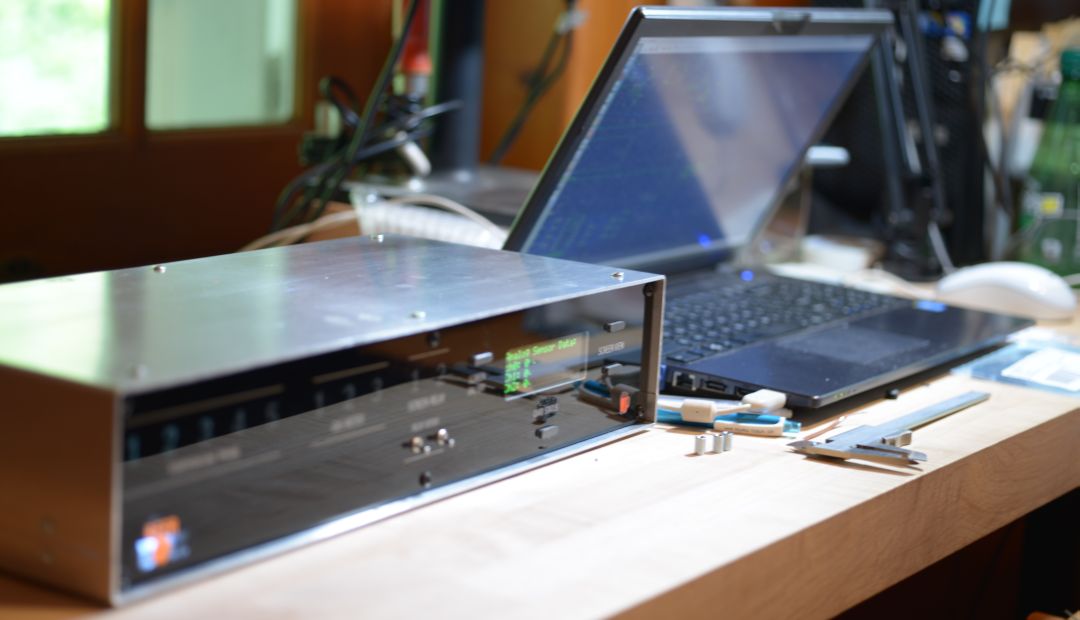
BeerBotz - Hardware Overview
The BeerBotz interface has environmental sensor connectors (for temperature probes and gas
meters), and an on-board barometer. The Windows™ PC application controls the
interface via a USB connection. The user defines settings in the PC app. that control how
often the environmental sensor readings are taken (sample rate). Once "Started", the
interface sends the latest sensor readings to the PC as a USB packet at the specified
sample rate. Upon receipt of each data packet, the PC app. handles these values in
various ways (stores them, averages them, etc.).
BeerBotz - Front
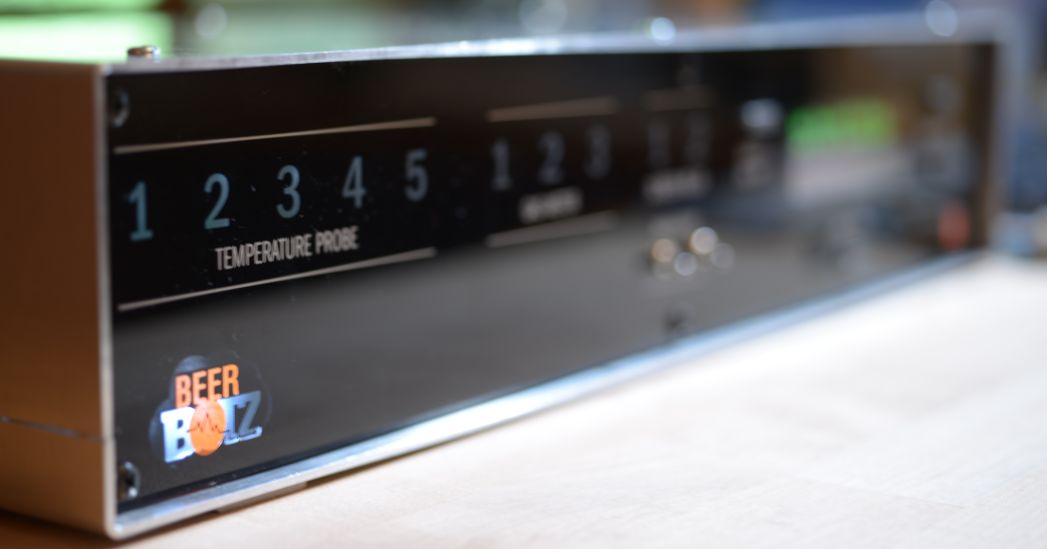
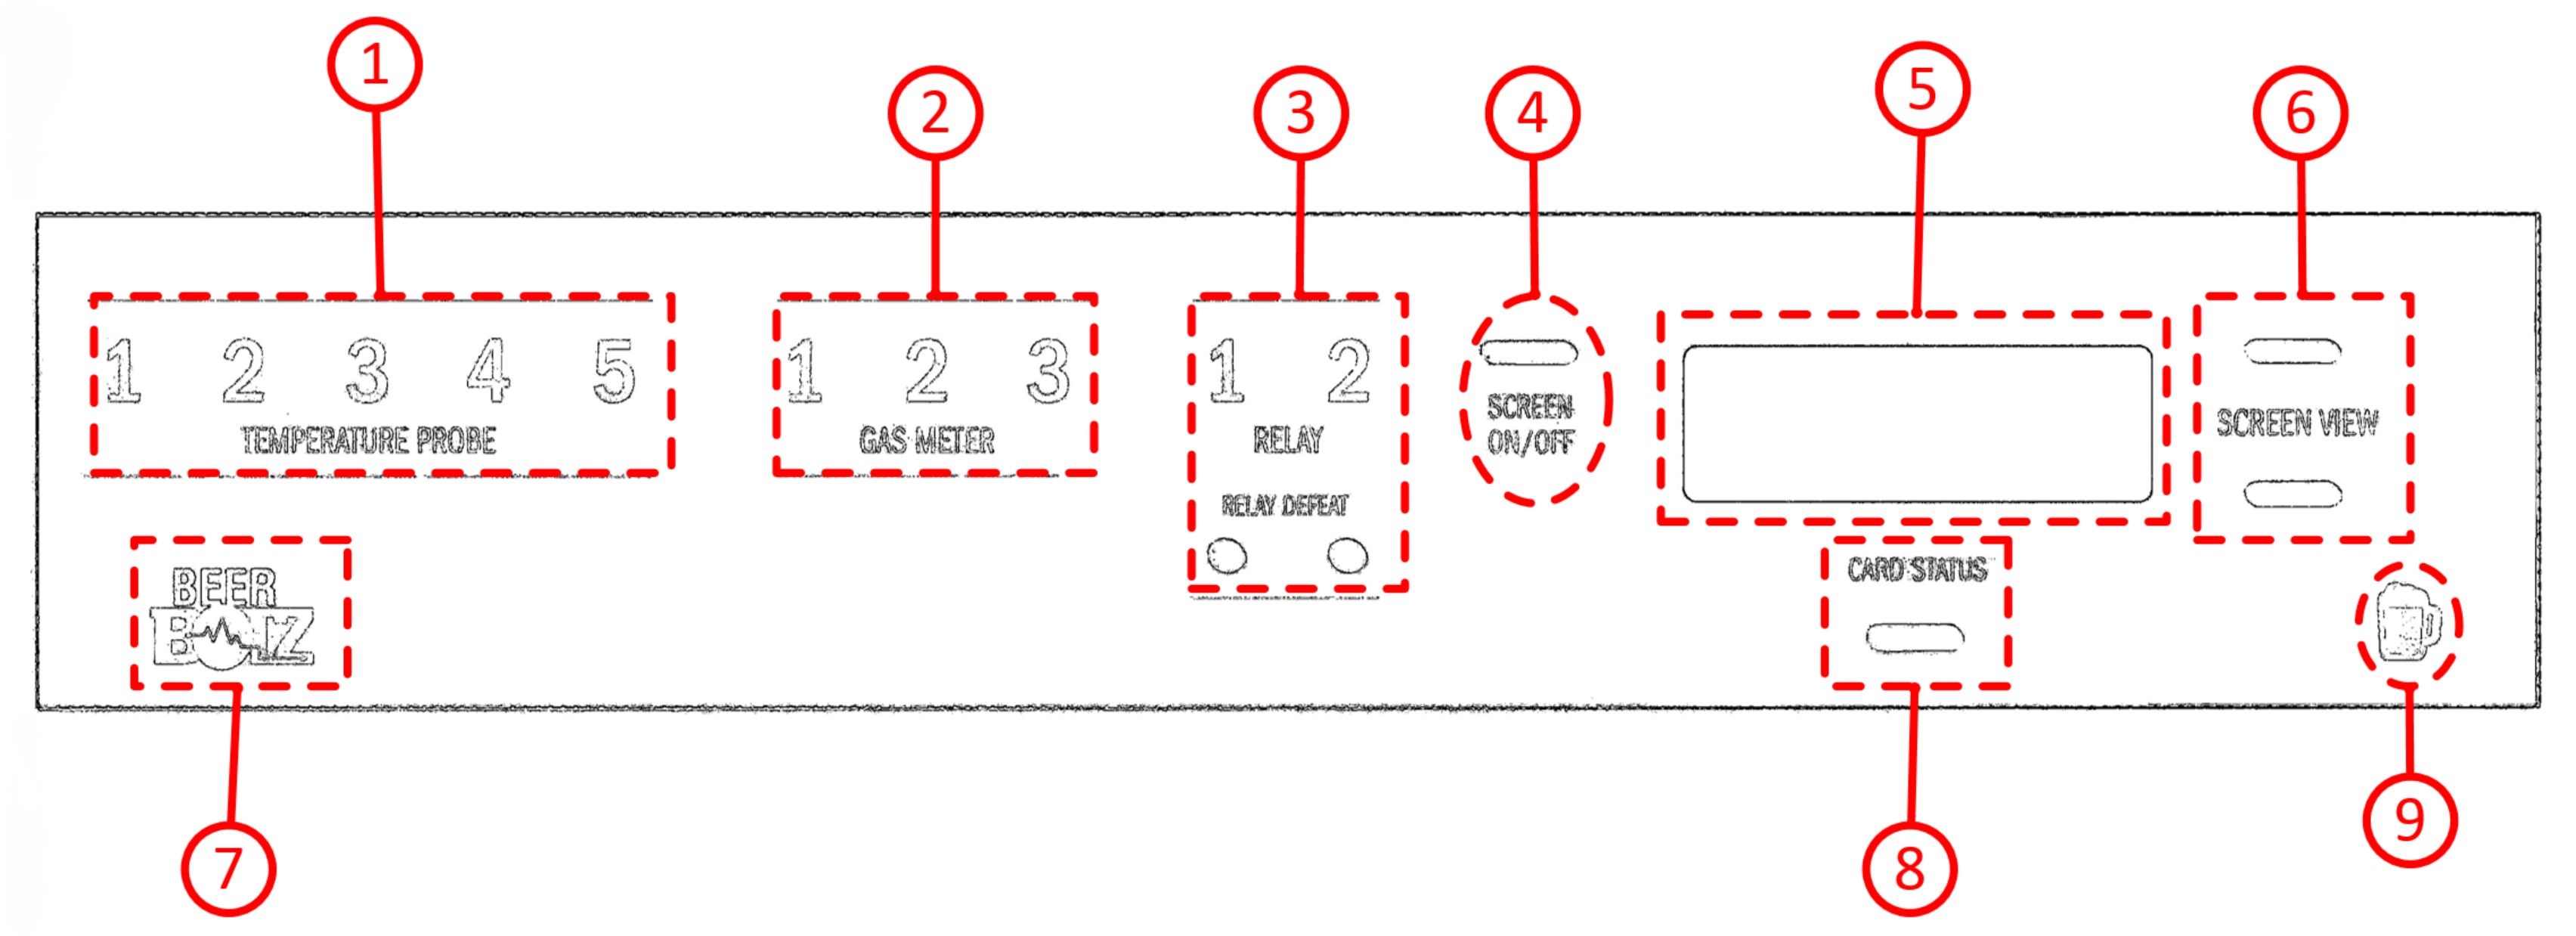
Front Panel
| Item # |
Description |
| 1 |
Temperature probe status lights 1-5. Backlight changes color with regard to input status.
Disabled: No light; Enabled/not connected: Red; Enabled/connected: Green. The BeerBotz
interface uses Type-J thermocouples on the temperature inputs.
|
| 2 |
Gas meter status lights 1-3. Backlight changes color with regard to input status.
Disabled: No light; Enabled/zero volts detected: Yellow; Enabled/1 volts detected: Green.
The Honeywell™ AWM-type gas meters output 1 volt at zero gas volume, and
5 volts at their full range of gas flow. Thus, if a functioning AWM meter is connected
properly, but their is no flow, the BeerBotz interface will read 1 volt at that input.
|
| 3 |
Relay output status lights 1-2, and relay defeat switches. Backlight for output number
changes color with regard to input status. Disabled: No light; Enabled/defeat switch "On":
Red; Enabled/Cooling "On": Blue; Enabled/Cooling "Off": Green. Relay outputs are designed
to energize a medium-sized chest freezer (~15 Cu.Ft.) which is <7 amps @ 120 volts AC.
For any other electrical load types, the user must supply an overcurrent protection relay
in line with the BeerBotz relay output. Also note that, as the chest freezer ages, the compressor
will draw more and more amps until it eventually fails completely.
|
| 4 |
Screen On/Off toggle button. Use this to turn the BeerBotz interface OLED screen (Item #5)
off if not needed.
|
| 5 |
OLED screen. This screen scrolls through pages that show the current status of the inputs.
This can be useful while initially connecting the inputs. All the configuration of the
BeerBotz interface is done via the PC application. No configuration is done using this screen.
|
| 6 |
Screen View up/down buttons. Use these buttons to seek a particular page on the display
that shows the status for what you are interested in. For example, if you are connecting
thermocouple 3, use these buttons to seek to the page that displays the current readings
for the thermocouples. If input 3 is reporting a reasonable temperature, it is connected
properly. While the USB cable is connected, these inputs are not being sampled/updated
until "started" from the PC application. Thus, if not started, the values on the
screen will not change.
|
| 7 |
BeerBotz logo: This logo has a white backlight that lights up when the power supply is
properly attached to the BeerBotz device.
|
| 8 |
Card Status: The card status button is used to modify the current status of the flash Card installed
in the BeerBotz interface. During autonomous operation (PC not connected), the BeerBotz interface
can read the input values and write them to the flash Card. The button can toggle between the busy
and idle states for the card. During autonomous operation if the user need to replace the flash Card
with an empty one, this button is pressed to stop saving data to the card. Once the card is "Idle"
(as indicated by the flash card screen on the OLED display), the old one is removed, and replaced
with a fresh/empty card. The button is then pressed again to re-start saving to the new card.
Saving to the card is available during autonomous operation (PC not connected) mode only. While
the PC is connected, the card is available as a disk drive to enable the user to pull to old
files off of it. The filed are named with the file creation date.
The text files that are created by the BeerBotz interface are usually pretty small by todays
standards (< 1 meg). They are comma-seperated, so they would have to be imported into
Excel™ for viewing. The maximum card size allowed is 32 GB. The card formatting needs
to be FAT32.
|
| 9 |
Beer Mug Icon: this icon has a backlight that changes color depending on the state of the
interface (in USB-connected mode). Red is "not-started"; white is "started".
|
BeerBotz - Back

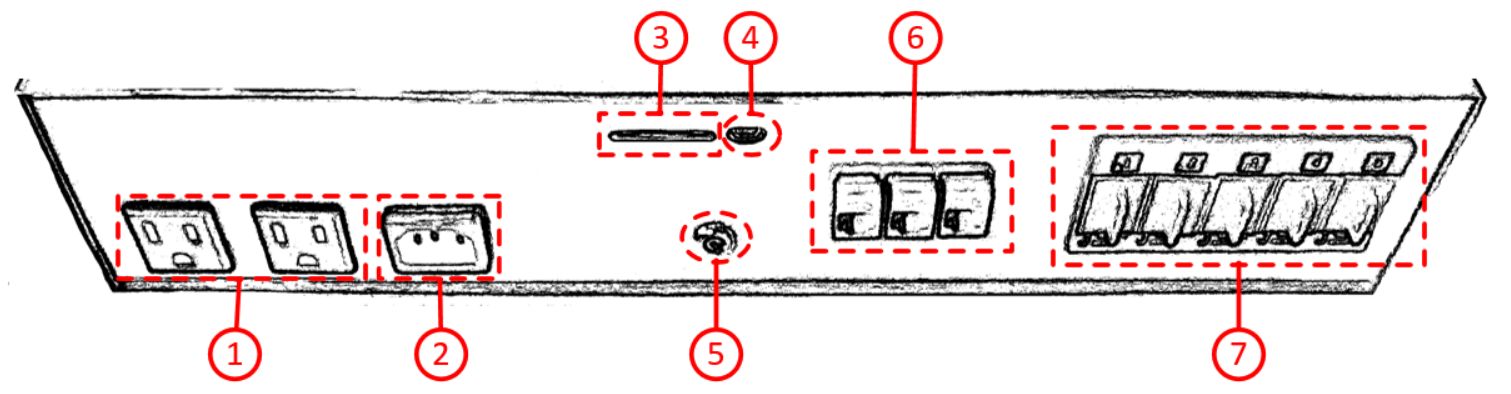
Back Panel
| Item # |
Description |
| 1 |
Relay outputs 1-2. These outputs are designed to switch the power to a medium-sized
chest freezer on and off. (A medium-sized chest freezer is ~15 Cu.Ft. and draws <7
amps @ 120 volts of AC power.)
|
| 2 |
120 volt AC input: This is the separate 120 volt AC power input that is used for the
Relay outputs (Item #: 1). This allows the power for the relay outputs to be drawn
from a separate electrical circuit from that which is used to power the BeerBotz
interface.
|
| 3 |
Flash Card slot: The BeerBotz interface can save sensor values to an SD Card during
autonomous operation (PC not connected). The maximum card size allowed is 32 GB.
The card formatting needs to be FAT32.
|
| 4 |
USB connection: Mini-USB connector to PC. This is the connction to the BeerBotz
application on the Windows™ PC. There are no drivers to load. The drivers
used are the standard ones included in the Windows™ operating system.
|
| 5 |
Power Connector: This is the power input for the BeerBotz interface. This is for
the 15 volt DC/1 amp power supply included with the device. This is the power for
the device itself, but not the relay/chest freezer outputs. The power for the relays are from
the Item #: 2 connector.
|
| 6 |
Gas meter inputs 1-3: The gas meters used are Honeywell™ AWM-type. These
connectors provide power to the gas meter, and also return the gas mass volume signal
from them. The gas meters output 1 volt at zero gas volume, so if this connector
seees the 1 volt input, it knows that the gas meter is connected.
The cable used is a regular RJ-45 straight-through ethernet cable, but never connect
this to a piece of networking equipment or damage will occur!
At the gas meter side, the connector will light up green is there is power coming
to from the BeerBotz interface.
|
| 7 |
Temperature probe inputs 1-5: These are Type-J thermocouple female snap-in panels
(Part #: OMEGA UPJ-J-F) for connecting the temperature probes.
To make a connection to read a temperature, a cable must be made that extends this
jack to the thermocouple probe. The cable would include the male connector for this
panel jack (standard size, Type J (Iron/Constantan)), a length of Type J
(Iron/Constantan) wire, and another connector to mate with a stainless steel 1/4 inch
temperature probe. This probe can be inserted into a thermowell that has been
permenenantly mounted to the fermenter. This allows the probe to be easily removed.
The stainless steel probe can be ordered from Omega Engineering in any length desired.
(example part #: JQIN-116G-12, 304 SS Sheath). This probe should specified so that the
junction is "ungrounded". If the thermocouple junction is grounded, it is possible that an
interfering electrical signal can be picked up from the brewing solution, and cause
the temperature results to be incorrect.
Each temperature probe assembly will have an individual property about it that may make
the temperature reading off by a couple of degrees. If desired, there is an optional
calibration procedure
(see video: Thermocouple Calibration)
that can correct for these properties, and get the probe to read
more accurately. After the wire length and probe are installed, the probe is soaked in
an ice bath (which is exactly 32 degrees F). The offset from the true 32 degree F reading
is taken note of, and this value is input into the BeerBotz PC app. The BeerBotz system
will apply this correction factor to all of the readings from this input. This correction
factor is slightly different for each wire/probe pair.
|
*Not Shown*: There is an on-board barometer included in the BeerBotz interface. This can be used to
correct the volumetric gas flow results to mass flow in cases where a a volumetric gas flow meter
is used.
The Honeywell™ AWM-type meters output a mass volume, which is already in the form that we want.
The barometer value would only be necessary to correct a volummeteric flow meter to a mass flow. The
BeerBotz system can be configured to accept gas meters other than the Honeywell™ AWM-type, but
this is a factory operation.
BeerBotz - Air Meters
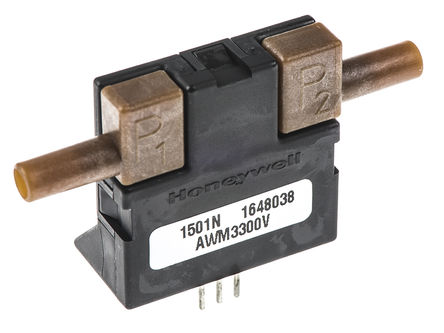 Honeywell™ AWM3300V & AWM3303V
The BeerBotz system is set up to use Honeywell™ AWM-type air meters to measure the
fermentation gas coming from the fermenter. These meters output 1 volt at their lowest flow rate,
and 5 volts at their maximum flow rate. The specific flow range of the meter is selected based
on the maximum amount of gas that can be produced from the fermenter. If the flow rate of the
fermentation gas exceeds that of the range of the meter, you will just have the meters
output "pegged" at five volts. The BeerBotz PC application is set up to report a value of
10,000 in the case that the meter output voltage is exceeded. This obviously abnormal value
makes it clear to the user that there is a malfunction.
 Honeywell™ AWM5101VN & AWM5104VN
One also wants to take care not to select a meter that has too large of a range. The AWM meters
have four total volts of usable output range (1 to 5 volts). If the meter range is too large, the
voltage readings spend most of the time near zero flow (output ~1 volts), and the resolution
between the different flow rates will not be as accurate as it could be.
So, we need a meter that can accomodate our maximum flow, but has the lowest flow range possible
to have the best possible accuracy at the lower flows.
 Honeywell™ 720P1
The table below lists the maximum batch size (in barrels) that each supported meter can accomodate
at two different
fermentation temperatures (60℉ & 65℉). (1 barrel = 31.5 gallons.) Notice that, for an
AWM5104VN, the batch size decreases from 12.4 to 9.2 barrels (14.7%) when you raise the fermentation
temperature from 60℉ to 65℉. This table assumes a "medium" starting gravity of ~1.055.
By "supported meter" I refer to the fact the the BeerBotz PC application has a built-in table that
converts the AWM meters' raw voltage to a gm CO2/minute value. This is the value needed for the
specific gravity calculation to work.
(see video: Software Start-up - SG Calc)
To choose the correct gas meter gas meter, you need to know three things:
- Maximum batch volume
- Maximum fermentation temperature
- Maximum starting specific gravity
The maximum batch volume is pretty easy... your fermenter can only accomodate a certain defined maximum volume.
For the maximum fermentation temperature, you can use the two values provided in the table below to
extrapolate for your conditions. If you are planning to ferment at 70℉, you know that the maximum
barrels decreases by 14% from 60℉ to 65℉, so just decrease the volume by another 14%
(multiply by 0.14) for maximum batch volume at 70℉.
The specific gravity points are pretty easy to scale. 1.020 has twice the sugar as 1.010 (twice the density).
So you can arrive at a scaling factor in this way to extrapolate to a different S.G. value. You have
to drop the preceeding "1" to find the ratio between the two S.G. values.
eg. If you are planning to use a meter for 1.075 S.G.: this table is based on S.G. = 1.055
--> 075/055 = 1.36. So, 1.075 has a 36% greater density than 1.055. That means you can decrease the meters'
stated max batch size by 36% in order to accomodate this high gravity batch.
If all this is hurting your brain, just call us, or send an email to: info@beerbotz.com and we'll get
you set up!
Air Meter Table
| Honeywell™ Part # |
Flow Range |
Max. Batch size (@60℉) |
Max. Batch size (@65℉) |
Description |
| AWM3300V |
0-1 SLPM |
0.997 Barrels |
0.825 Barrels |
Zero flow is 1V; Max. flow: 5V. |
| AWM3303V |
(+/-)0-1 SLPM |
(+/-)0.997 Barrels |
(+/-)0.825 Barrels |
Zero flow is 3 volt* |
| AWM5101VN |
0-5 SLPM |
3.21 Barrels |
2.657 Barrels |
Zero flow is 1V; Max. flow: 5V. |
| AWM5104VN |
0-20 SLPM |
12.761 Barrels |
10.565 Barrels |
Zero flow is 1V; Max. flow: 5V. |
| AWM720P1 |
0-200 SLPM |
103.15 Barrels |
85.4 Barrels |
Zero flow is 1V; Max. flow: 5V. |
| AWM730B5** |
-300 to 300 SLPM |
(+/-)154.73 Barrels |
(+/-)128.1 Barrels |
-300 SLPM flow is 1V; Max. flow: 5V. |
*For the AWM3303V, maximum positive flow is 5 volts; maximum negative flow is 1 volt.
**No voltage to CO2 mass cal table as of 3/2018.
Another operational consideration is that these AWM meters are ruined if liquid ever runs through them.
The fermentation system needs to have the proper head space in the fermenter and a properly sized
blowoff bottle to insure that the meter never gets liquid through it.
There is a distinction between volumetric flow and mass flow. An example of volumetric flow
would be if you were to measure the air coming out of ballon by how fast it moves a fan. If you chilled
the ballon first, it would decrease in size and the fan would move less. The only way to figure out
how many "atoms" of air you had would be to correct for temperature and pressure using the gas
equation.
The AWM meters read as "mass flow". That means that the meter is telling you the number of "atoms"
that is flowing through the meter regardless of the temperature or pressure of the gas. This is
handy for our purposes. Using the method outlined in US Patent 6,942,962, the CO2
(fermentation gas) mass can be used to calculate the sugar (specific gravity) and ethanol masses.
Instead of a graph showing the mass of the fermentation gas, one could have a calculated column
showing the increase in ethanol or decrease in specific gravity.
The A-to-D inputs (air meter inputs) on the BeerBotz system can be set up to output either voltage
(see Software Start-up videos) or (if available for the meter type) the meter input can can
be configured to output the values directly as mass of the CO2. This happens via a "cal table"
that can be selected on the Acquisition tab (in the BeerBotz application).
These A-to-D inputs accept a 0-5 volt signal from the sensor. This is a common way for sensors to transmit
their readings to a data logger. It is possible to support different sensors (in addition to the
Honeywell™ AWM meters) in the future. This is a factory operation. If there is interest expressed
in a particular sensor in the forums, we will try to get it working with the BeerBotz interface.
For example, say we wanted to use a volumetric gas flow meter (instead of mass flow). We would save the
volume results in an Excel™ column. Then using this and the results from the on-board barometer and a
temperature probe we can use the Ideal Gas Equation to convert gas volume to CO2 mass
(gm CO2/minute). Once we have the mass we can further calculate the ethanol production and
sugar consumption. The Excel™ spread sheet takes care of updating these running calculations.
This is cpu-intensive when the Excel™ workboark becomes large, so it is nice to have a fast computer.
These Excel™ templates are included as blank workbooks with the BeerBotz application.
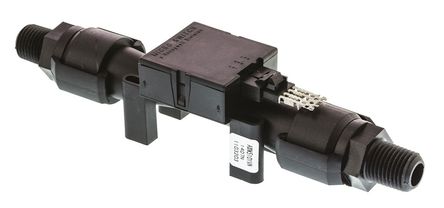
 Air Meter Box
The air meters above are mounted to a box that converts the connection to the meter to an RJ45
connector. The cable used is Cat 5e or Cat 6 with a standard gigabit ethernet pinnout (8 conductor).
These cables are easily made to custom lengths on site with an RJ45 crimper tool
(See video: "Gas meter connections").
The cable both provides the power for the air meter and returns the air meter signal voltage
back to the BeerBotz interface. There are also fine and course zeroing pots on the Air Meter
Box. These are set so that the meter reads exactly 1 volt with zero gas flow (with meter capped).
Interactive Gas Meter Selection Tool
The correct meter for a given application is calculated by combining the following three conditions:
- Maximum batch volume (in barrels; 1 barrel = 31.5 US gallons)
- Maximum fermentation temperature (in degrees fahrenheit)
- Maximum starting specific gravity (temperature corrected)
By filling in these three inputs for your conditions, this tool can display the expected maximum
gas flow rate. This max rate is then compared to the capabilities of each of the available flow
meters. If the result for a particular meter is >100% you will max-out the meter in this
application... select the next higher-capacity meter.
Barrels:
Temp (F):
Specific Gravity:
3300
5101VN
5104VN
720P1
730B5
BeerBotz - Temperature Probes (Type-J Thermocouples)
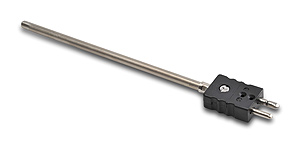 Stainless Steel Type-J Thermocouple Probe
Thermocouples use the fact that each different metal alloy has a different affinity for electrons.
The result is that if two dissimilar metal alloy wires are connected on one side, a voltage between
the two wires can be measured on the other end. Furthermore, this measured voltage varies depending
on the temperature of the junction of the two metal wires. The "Type-J" designation specifies the
alloy types for the two wires.
These thermocouple assemblies can be ordered directly from OMEGA Engineering Inc.™
(Omega Engineering™ - Thermocouples).
For each temperature input on the the BeerBotz interface, you will need a: 1) probe, 2) thermocouple
wire, and 3) a male connector to mate with the female input connector on the BeerBotz interface and
4) a female connector to mate with the probe
(see video: Thermocouple Assembly).
I usually order 1/4" stainless steel "un-grounded" probes. Omega™ lets you customize them to
any desired length. They are ~$35 each.
Omega Engineering™ - Thermocouple Parts list
| Omega™ Part # |
Omega™ Part Name |
Description |
| TT-J-24-100 |
INSULATED T/C WIRE |
100 feet of 24-gauge Type-J thermocouple wire |
| JQSS-14U-24 |
QD T/C WITH MOLDED CONNECTOR |
Type J stainless steel probe; 1/4"; 304 SS Sheath;
24" length; un-grounded; (probe connector is male, and the female mate connector is also included.) |
| OSTW-CC-J-M |
INTEGRAL CABLE CLAMP CAP CONN |
Type-J male connector (for BeerBotz side of thermocouple assembly) |
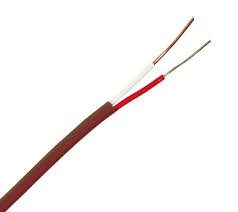 Type-J Thermocouple Wire
When making the thermocouple assembly you must take care to match the metal alloy types on the
wires and connectors. For thermocouples, there is always a "+' side and a "-" that all
have to be matched up together.